Showing posts with label Lab. Show all posts

Wednesday, October 29, 2008

Brettanomyces, Pellicles, & Oak Barrels

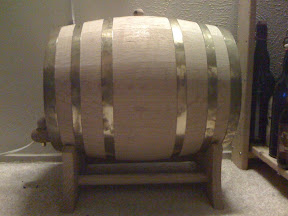
I acquired an oak barrel to age half of my Winter Warmer ale this year to give it that Extra Special Reserve (heh, ESR) kind of a kick.

Well it appears, using the oak barrel, I got more than I bargained for!

This year I did a 10 gallon batch of my winter warmer. 5 gallons got the normal treatment, bottling, and are currently aging. The other 5 gallons instead of going to the bottle spent an extra week in the oak barrel, and then last Sunday were racked to my secondary.

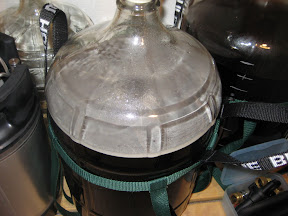
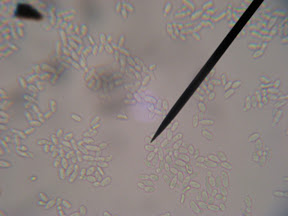
Well, yesterday (Tuesday night) I took a look and the secondary now has a white milky film across the top (Brettanomyces Pellicle). I then took a sample of the film and inspected it in the microscope expecting to find bacteria and a lost batch of beer. To my surprise it wasn't bacteria at all. It appeared relatively the same size as yeast cells, only sausage shaped instead of round like a yeast cell. It was much larger than bacteria, and contained a nuclei so I can pretty much be assured it's not bacterial and is indeed a Eukaryote (see budding yeast cells in image below). 

So, that got me on my search to which I found this in the homebrew wiki.

Quote:
"Brettanomyces, often called Brett for short, is a genus of yeast consisting of multiple species found naturally in wood. Brettanomyces contributes distinctive flavors to the beverage it grows in. It gernerally considered an undesirable, spoiling infection by home brewers; however, its extreme, distinctive flavor and aroma is considered desirable in some sour beer styles, and at low levels it is depended on to add complexity to many styles of wine."

Wikipedia adds;

Quote:
The cellular morphology of the yeast can vary from ovoid to long "sausage" shaped cells. The yeast is acidogenic and when grown on glucose rich media produce large amounts of acetic acid. Brettanomyces is important to both the brewing and wine industries due to the sensory compounds it produces.

In the picture of the secondary you can see a white film that has formed on the racked beer. Interesting enough the purpose of this "white film" or "velo de flor" of yeast gives the beer protection from oxidation and other infections by preventing air from contacting the wort. This is indeed going to be some strange brew, but the technique of using "wild" yeast (Brettanomyces in this and most cases, and sometimes the bacteria Lactobacilus) is not an uncommon one and is done in a very sought after style of Belgain beer refered to as a lambic.

Since my winter warmer is indeed a sort of spiced up brown ale (with cloves, cinnomon, nutmeg, to name a few), I figured I'll roll with it and see how it turns out. It seems to be a very fitting style for this experiment. 

I have put a previous batch (another brown ale) through the barrel already, and the same thing happened, though I ignored it as a mild infection and bottled it. The Brown was a little sour, and very complex, and actually pretty good after it aged a few months.

After the brown ale "infection", as I assumed, I went ahead, and just sanitized the barrel really well with Potassium Metabisulfite and let that sit for a few months prior to my Winter Warmer figuring that would be enough to pretty much kill anything. Apparently it doesn't kill Brettanomyces in the dosing regiment I used (1/2tsp Potassium Metabisulfite per 5 gallons) like it does normal yeast and bacteria. Apparently even most sanitizers will not kill it, though I've heard rumors that StarSan will, and other sites confirm that Sulfur Dioxide does.

As for the barrel, there is no way of ever ridding it of it's personal yeast. Being porous by nature, the wild yeast more than likely is embeded deep in the wood, and has been there from the beginning of the life of the forest it came from. So I do expect to do some very interesting lambic fruit styles in the future using nothing but the barrel as the yeast source.

As for the Winter Warmer, I got a 25ml sample to try. The smell was good, alcohol (it is near 9% after all), oak'y, special spices, cloves, wintery, a hint of sourish-ness but nothing harsh. Something to be excited about!

Overall, nothing taste or smells out of whack, pretty much like I expected it to taste. So cool, well see how it ends up! Should be an interesting result.

Saturday, October 25, 2008

Fermentation Tube

I'm a bit of a sucker when it comes to lab equipment. I love gadgets. This is one of those things I picked up that I figured would just be a novelty, but became a coveted piece of equipment in my lab.

A fermentation tube is essentially a way you can visually be assured the yeast you are cultivating are alive and well. When yeast convert sugar to alcohol a byproduct is CO2 gas. When working with very small scale fermentation you often can't get a real good visual (without a microscope) of how well the yeast are preforming. When I reanimate a strain from storage in a test tube, I don't have any real visual reference to know if the yeast is becoming viable. With a fermentation tube, you can view the amount of gas being created and then verify your yeast is indeed working away and its not just some bacteria (as bacteria will cloud the wort, create sediment, and not produce any gas).

As you see in the photo, it's nothing more than a curved tube with a larger reservoir to collect the wort as the gas gathers at the top of the tube. The actual tube is graduated (10ml in my example) to allow you to note the amount of CO2 being produced.

I generally use this to test my stored samples, or to reanimate a strain for a starter. Works well, and is neat looking to boot!

Thursday, October 23, 2008

Sterile Water Yeast Storage

This was sort of the catalyst for the whole blog. I ran across an article written by Dave Whitman titled "Sterile Distilled Water Yeast Storage". In this paper, Dave details pretty much everything I have going here. Instead of just regurgitating everything Dave wrote in my own words I'll just repost his article here for archival purposes (as he grants this at the bottom of his article) and add my notes before.

I will attest that, this method works. How long it works I guess is up to your lab habits. I've been able to isolate and store over 6 strains of yeast in 1 dram vials and take those and reanimate them in clean test tubes. For the sterile water, I am using generic saline solution that you would generally use for contact lenses. 

So bravo Dave for writing this! Your work is well appreciated.


Sterile Distilled Water Yeast Storage
v1.0 10/1/96 by Dave Whitman (dwhitman@rohmhaas.com)

INTRODUCTION

Yeast can be stored for long periods of time (months to years) in a dormant state under sterile distilled water. The samples are tiny, so you can keep many different yeast strains in a small area. No refridgeration is needed.
The procedures I use are largely adapted from a 1 day course in yeast propagation that I took at the American Type Culture Collection. ATCC is in the Washington DC area, and they give the course once a year; I recommend it highly if you're within driving distance. There is a very nominal fee ($30?), and you come away with free yeast cultures to offset the cost of the course.

STERILE TECHNIQUE

Be fanatical about sanitation. You'll be transfering very small numbers of yeast cells around, and the tiniest amount of bacterial contamination can force you to re-isolate a culture.
Wort, distilled water, and all containers should be STERILIZED (not just sanitized). This means pressure cooking 20 minutes at 15 psi, or repeatedly boiling for 30 minutes on 3 days in a row.

I sterilize my innoculation loop by heating it in a flame until it turns red, then quench it by touching sterile water or the surface of a slant. Alternatively, you can use sterile flat toothpicks - wrap a bunch in aluminum foil and pressure cook along with everything else. Another option is to use disposable sterile syringes.

Work in a draft free room to avoid stirring up dust. Avoid using a vacuum cleaner in the same house for several hours before, because it will stir up dust. Wipe down your work surface with bleach diluted 10:1 just before starting. Follow that with a alcohol wipe down. Open and close containers quickly, while trying to hold the opening horizontal (to minimize the chance of dust drifting in).

Arrange everything in an organized way on your work surface so that you don't have to move your hands around too much and generate air currents.

PREPARATION OF SAMPLES FOR STORAGE

Start with yeast cultures growing on slants or plates.
Add 2-3 ml distilled water to small vials. I use 1 or 2 dram vials, readily available at places that sell essential oils or bulk perfumes. Pressure cook the loosely capped water vials for 20 minutes at 15 psi.

Using a sterile loop or other implement, grab a small amount of solid yeast from a slant. You don't need or want too much - about the size of a match head. Try to avoid picking up any of the solid media. Transfer to a water vial, then cap it tightly and wrap the cap with tape to seal. I like to make 2 vials of each yeast. One is "working", the other is "archival".

You can store these vials at room temperature for at least 6 months, probably for years. The concept is that in distilled water with no nutrients around, the yeast just go dormant. (That's why you want to avoid transfering any nutrient media when you grab the sample - you're TRYING to starve them).

PREPARATION OF STARTERS FROM STORED SAMPLES

I make up premeasured samples of starter wort ahead of time: SG 1040 wort, pressure canned in containers of the right sizes to build up a reasonable starter volume in safe steps. I use a 3-step build up: 4 mls of wort in ascrewcap test tube, 40 ml of wort in a 10 oz juice bottle, and 350 ml of wort in a 16 oz juice bottle.
The nice thing about using old juice bottles is that they have vacuum seal caps. Put the caps on loosely, pressure cook 20 minutes at 15 psi, then tighten lids while the wort is still fairly hot. As they cool, the vacuum seal should form. The test tubes don't have vacuum seal lids, but if you tighten them and tape the joint, they seem to keep well. After sealing, shake up the samples to pre-aerate them using the air in the head space of the container.

I start building my starter up 1 week before brewing. Shake up a "working" vial to resuspend the yeast, then open it and quickly transfer a single drop of suspension into a test tube with 4 ml of wort using a sterile tool such as aninnoculation loop. Reseal the vial and loosely cap the test tube. Because you use only one drop, as long as your sanitation is good the stored culture can be used for many, many batches.

Let the yeast work for 1-2 days, swirl and dump the whole thing into a 40 ml wort sample. Don't expect to see much of any activity at either of these stages - there just isn't enough yeast to generate any obvious CO2 evolution. After another 1-2 days, swirl, then dump the whole 40 ml into a 350 ml wort sample. After 1 or 2 days, you should see visible bubbling in this larger starter. You could (and arguably should) continue to step this up to even higher volume, but for ales I get good results just dumping the 350 ml starter into a 5 gallon batch.

I don't bother with an air lock for any of the starter stages - I just keep the lid on loosely to allow CO2 to escape. I haven't had a starter go bad yet after about 10 batches. YMMV.

LONG TERM CULTURE MAINTANENCE

Periodically, it's a good idea to reculture the yeast to ensure that they're alive and healthy. At the ATCC course, they recommended reculturing every 6 months, although they said there was literature precident for storing samples for 5 years. For comparison, they said that if you use slants for storage, you should reculture every 2-3 months. I suspect many people keep slants far longer than this.
They also recommended only saving samples in water that you pull off of solid media like a slant or plate, since you can look at it and see if there is any obvious contamination.

To reculture, prepare slants. Open your "archival" (unused, and hence uncontaminated) vial, and streak a single drop of slurry onto one or more slants. Let them grow out, and assuming the colonies looks clean and healthy, transfer to sterile distilled water for another storage period.

SLANT PREPARATION

Prepare a small amount of SG 1040 wort. Add 1.5% agar by weight, and heat until the agar dissolves. While still hot, add 2-3 ml of solution to 2 dram vials, then loosely cap. Put the vials in a tin can or something to hold them upright, then pressure cook 20 minutes at 15 psi. While still hot, tighten the caps, then prop the can at an angle to tilt the vials at a 45 degree or greater angle. Allow to cool and solidify.
You can buy agar cheaply at oriental groceries. In my area, it comes in packages of 1" square sticks that are about 10" long. There are 2 sticks to a package - one is off-white, the other is dyed lurid red which makes it easy to spot on in the store. The sticks have the texture of styrofoam, and you can easily break off or cut little pieces for making slants.

Friday, October 10, 2008

Staining & Yeast Viability


Above is a video of a Safale US-05 I got from the bottom of a bottle of a nice Pale Ale a friend of mine brewed. The sample was prepared using the following method and magnified 400x for your viewing pleasure.

Staining is a common practice to ensure the yeast you pitch in your starter are nice and healthy and capable of converting your hard efforts of brewing into the tasty beverage we know as beer. The idea is that healthy yeast will not absorb the stain while non-healthy (non-viable, non-metabolizing) yeast cells will.

"In the brewery industry, the most common yeast viability stain is methylene blue. In fact, methylene blue is accepted as the industry standard.1 However, in recent years, there have been reports that methylene blue stain may overestimate yeast viability.2 This stain has been reported to be inaccurate when yeast viabilities fall below 95%,3  hence, the use of an alternative stain, methylene violet, has been tested by several standard committees as a suitable alternative stain for yeast viability determination.4" - Comparison of the efficacy of various yeast viability stains by Stephen E Szabo  Ph.D.

So in this method I chose Methylene Blue, your mileage my vary in your stain of choice. It's worth noting that the stain that comes in the bottle is VERY concentrated, and in my experience is better served if you take a few drops in a clean vial and dilute it with a few ml of sterile water. This also reduces the intensity of the stain, and could help with the mentioned inaccuracies of staining viable cells.

Start with a clean slide, and a clean slide cover. Place the slide on a clean surface and put the slide cover in place. Then with your inoculating loop get a drop of the yeast slurry you want to examine and place it as indicated above (1) right where the cover and the slide meet. The sample should start to flow from right to left filing the space between the slide and the cover. Next take a dropper of your stain of choice and place it on the left side of the slide (2). The stain should then start to flow into the sample from left to right. I often do the second step while the slide is on the microscope. Watching the stain slowly flow across the sample is pretty neat.

The nice part about doing this method is that you can get a nice mix of intensities of yeast cells (more on the right) and stain (higher on the left) so you get sort of a gradient across the sample equilizing in the center.

Your results, if you have a healthy starter/sample, should be dominated with clear cells.


Wednesday, October 8, 2008

Been Caught Stealing...

"I've been caught stealing; 
once when I was 5... 
I enjoy stealing. 
It's just as simple as that.
Well, it's just a simple fact. 
When I want something,
I don't want to pay for it." 
- Jane's Addiction

If there has been one fact that took the longest to get though my tough head in brewing it would be that yeast, more than anything, contributes the largest part of the flavor profile of a finished beer.

Well, it's just a simple fact.

You can take some pale DME (or two row if you're into the all-grain thing) and you can make 6 different beers simply by your choice of yeast. A Belgian will make a lemon, sharp, fizzy beer, an American ale yeast like Safale US-o5 will make a clean crisp ale with some light fruity esters, or a heff yeast will again produce something totally different with banana esters and a hazy profile. All from changing one element. The Yeast.

So when it comes to enjoying the fruits of another breweries labor, I first go to the yeast. In this example, we are culturing yeast from a local brewery that in my opinion has some of the greatest ale yeast flavors I've found, Real Ale Brewing Company out of Blanco, TX. In this example their "Full Moon Rye Pale Ale".

Generally I've found good results, if I'm unsure the amount of yeast sediment or the viability of the dregs in the bottle, by creating a 10ml mini-starter. I then take the beer, pour off the good stuff in a glass to enjoy, and take the last little bit of the dregs swirl them around and then pour 5ml into the test tube to get a total of about 15ml of a mini-starter.

Wait that out for a couple of days to concentrate and wake up the dormant yeast (swirl or gently rock tube from time to time if you are the touchy feely type). This is also is a good time to prepare a few plates for the next step (See previous post on Beer Agar & Broth).  

Then with a very clean work area, working around a flame, and as always flame openings of containers when pouring (*You are flaming right!? Right?!?), open the tube with the broth and captured yeast and pour all but the very bottom sediment into another container (like a 50ml flask you see in the pic). Then get your inoculating loop red hot and get a film of the slurry/ sediment on the loop.


Next carefully half open the plate and streak the plate in four sections, rotating the plate counter clockwise (see image left). With each new section try to overlap with the streaks you did prior. Then close the lid, and place plate upside down in a clean place undisturbed.

The concept is that the streak in 1 is going to be the most concentrated (with yeast and other unmentionables), so we are trying to reduce the amount of cells with each new section in order to attain a single yeast cell to start a colony when we get to section 4.

After 24-48 hours you should see some activity. Yeast colonies will look like white puffy globes. What those look like and what you can do with them will come in a later post...

* - I haven't really covered sanitation or "Flaming" at this point, but I intend to at some point. I figure if you get this far, you should have a basic knowledge of sanitizing your equipment or at least Google some of these concepts before continuing.

Tuesday, October 7, 2008

Beer Agar & Broth


This is my current work in progress for a beer agar and broth for culturing yeast samples. The broth is sort of the first step and from that recipe you can just add agar to make plates and slants.

The recipe is in it's smallest form, you can adjust it for size. Generally you should be around a gravity of 1.030 with this formula. I assume this is sufficient, but I don't really have any other reference to go by.

Broth for culturing yeast in a test tube
OG 1.030 - Makes 10ml
  • 10ml water
  • 1g Light Dried Malt Extract (DME)
  • .01g yeast nutrient
Boil 5 minutes and cool. You can adjust the amounts to make larger amounts for starter or multiple tubes.

Beer Agar for Plates or slant
OG 1.030 - Makes 50ml (enough for 5x100mm plates)
  • 50ml water
  • 1g Agar
  • 5g Light Dried Malt Extract (DME)
  • .05g yeast nutrient
Boil 5 minutes and cool to touch swirling often to keep from setting up. Pour about 10ml per plate and tilt to fully cover (do this one at a time or else you'll get at the end and the plates will have already set up).

Use immediately or store in zip top bags in the refrigerator.

Friday, October 3, 2008

Building a Homebrew Gorilla Lab

To get started, I think I'll cover the lab. The basics of what you might need, some tips, and why even bother.

I mean, seriously, your not going to save money doing this. So why do it at all? I guess each person has their own reason. For me its the satisfaction of the knowledge gained. Its something fun to do, and the results are delicious.

Ok so.. Here we go!


Workspace - Clean, low air movement (away from fans a/c ducts, etc), preferably a permanent location that you can set up your experiments and leave the results in the same place (an unused closet works great). A sanatizable flat surface that is somewhat heat resistant and resistant to staining and spills.

I try to separate my work area into 3 segments. A top shelf that I store all the larger glassware and equipment that I use less often. The middle area for active cultures or experiments (as seen by the acrylic shelf in the photo), and my actual work area where I have all the items within close reach when I am working (Yes including a home brew to drink while you work ;).

Equipment - Generally you are going to need various glassware, alcohol burner, inoculating loop, microscope, storage vials, etc. Here's a basic inventory for what I have.
  • Erlenmeyer Flasks - 50ml(4), 250ml, 500ml, 1000ml, 2000ml
  • Glass Petri Dish (at least 2) - 100mm x 10mm
  • Test Tubes (6) & Rack - 15ml
  • Inoculating Loop
  • Wax pencil (marks on glass) - For labeling glass
  • Alcohol Burner - Preferably a wickless
  • Microscope, Slides & Covers - Preferably something capable of 400X magnification
  • Scale - Capable of measuring down to a 10th of a gram.
  • Test Tube Brush & Test Tube Clamp
  • 1 Dram autoclavable vials for storage of yeast samples
Chemicals - These are more like the "Soft goods" that chemicals really. But it's a general small list of things used to cultivate yeast, and build starters for pitching.
  • Dried Malt Extract (DME) - Preferably light or pilsen
  • Agar - Dried for making wort agar (I'll cover that in another post)
  • Yeast Nutrient
  • Potasium Metabisulfite - For sanitation
  • Gram Staining Kit
  • Methylene Blue
  • Denatured Alcohol
For the most part that is all you need and you'll never have to buy a commercial brewing yeast again, and the best part is that you can steal yeast from just about any unpasteurized beer on the planet. As for sourcing most of this can be found on www.cynmar.com and I've used www.homesciencetools.com as well.

Honestly do you really NEED all of this stuff? No. Not really. I guess you could make due with a few flasks, a couple of vials and a clothes hanger, but it's nice knowing for sure what your working with. Which is where a microscope comes in very handy. Check eBay, you would be amazed at how cheep you can get a "student" microscope (I found mine for $38).

In later post I'll cover the details of what you do with all this crap once you've amassed it!